
Signing and notifications
A debug build runs on a device without any of this. The moment you select a release or shipping configuration for Android, or any iOS configuration, the branch row grows a gear button that opens the signing form. This page covers that form field by field, and the Slack and Discord notifications that live on the same Connections page.
Where signing lives
Signing is configured per branch, not per project. Open Source Control Connections, expand the repository card, and look at the Build Configuration column of the Branch Configuration table. Once a branch is confirmed and its selection includes an Android or iOS configuration, a gear button appears in that cell. Its hover title is Platform specific configurations.
Above the gear, the cell tells you whether anything is required:
- Configuration Required, in amber, when the selection includes
android-releaseorandroid-shippingand no signing has been saved for the branch. The gear is outlined in amber too. A release or shipping Android build needs a keystore to be signed. - Optional Configurations Available when the selection includes iOS but no non-debug Android. iOS builds run without the form; fill it in when you need a signed, installable build.
- Nothing, when the only mobile configuration is
android-debug, or once Android signing is saved.
Click the gear to open the Platform Specific Configurations panel beneath the row. It shows an Android group, an iOS — Optional Configurations Available group, or both, depending on the branch's selection. The button at the bottom reads Add Configurations the first time and Save changes once something has been saved; it stays disabled until the form has both something to save and an edit that has not been saved yet.
Android
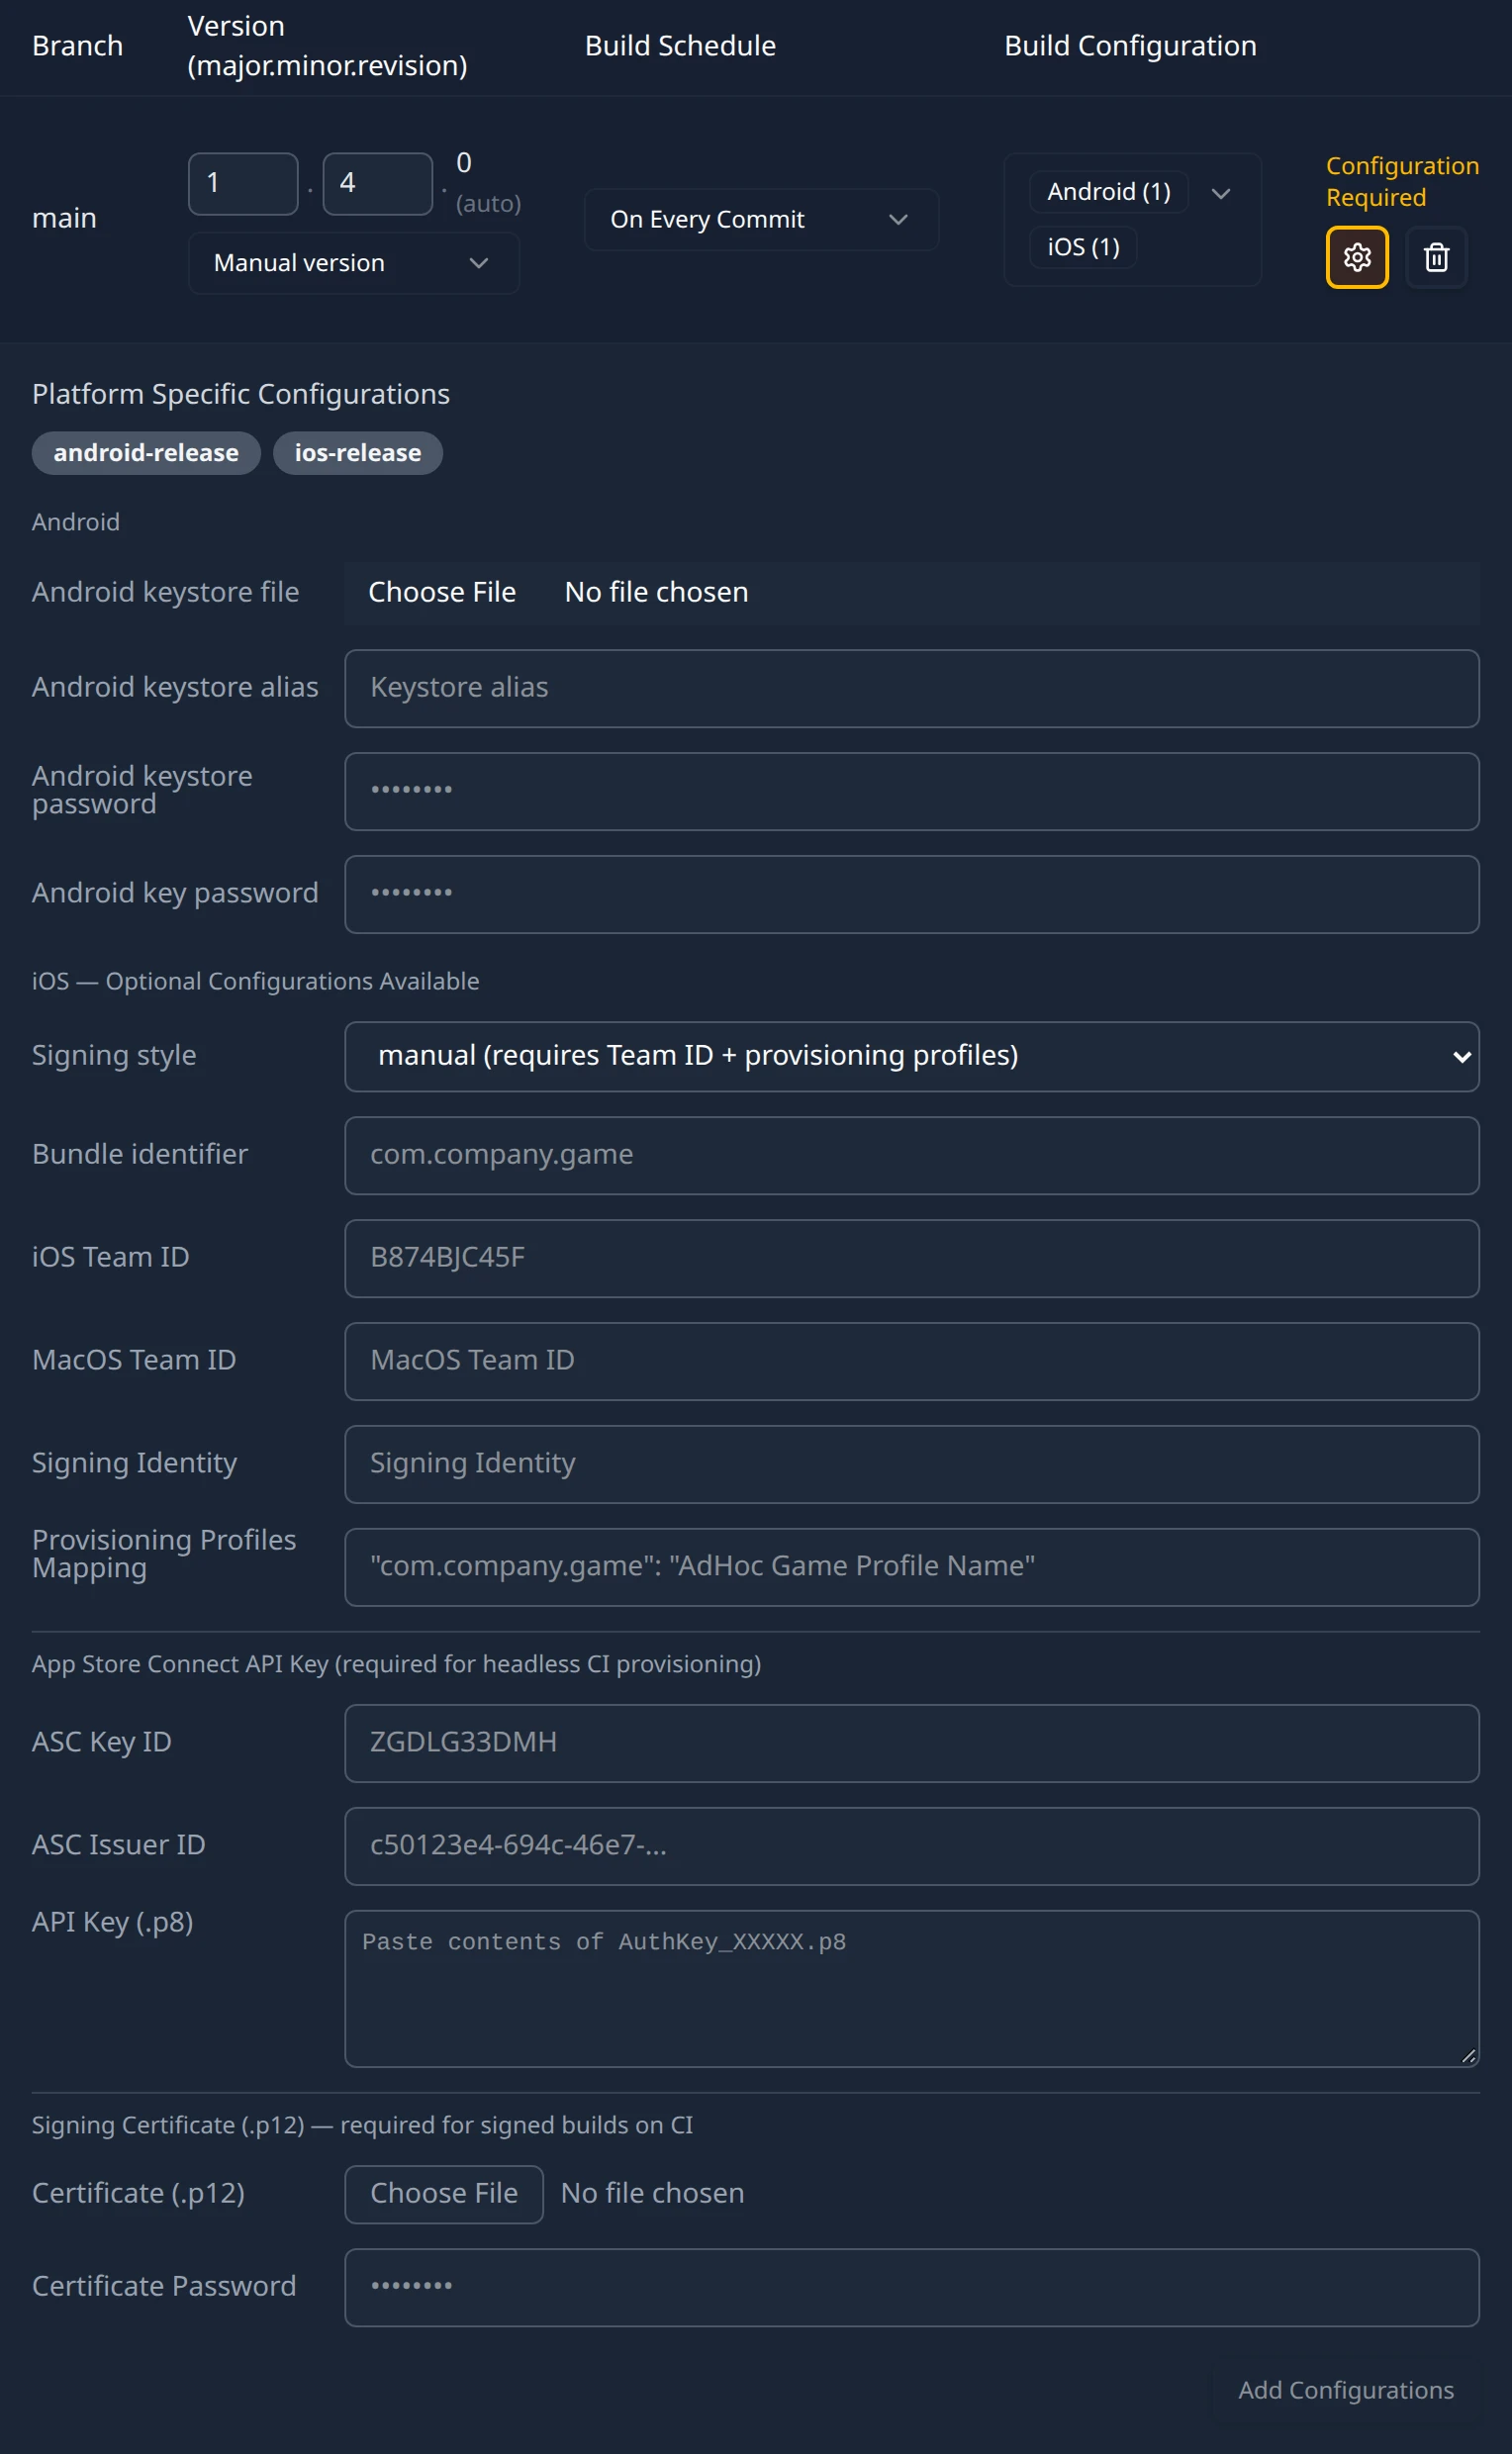
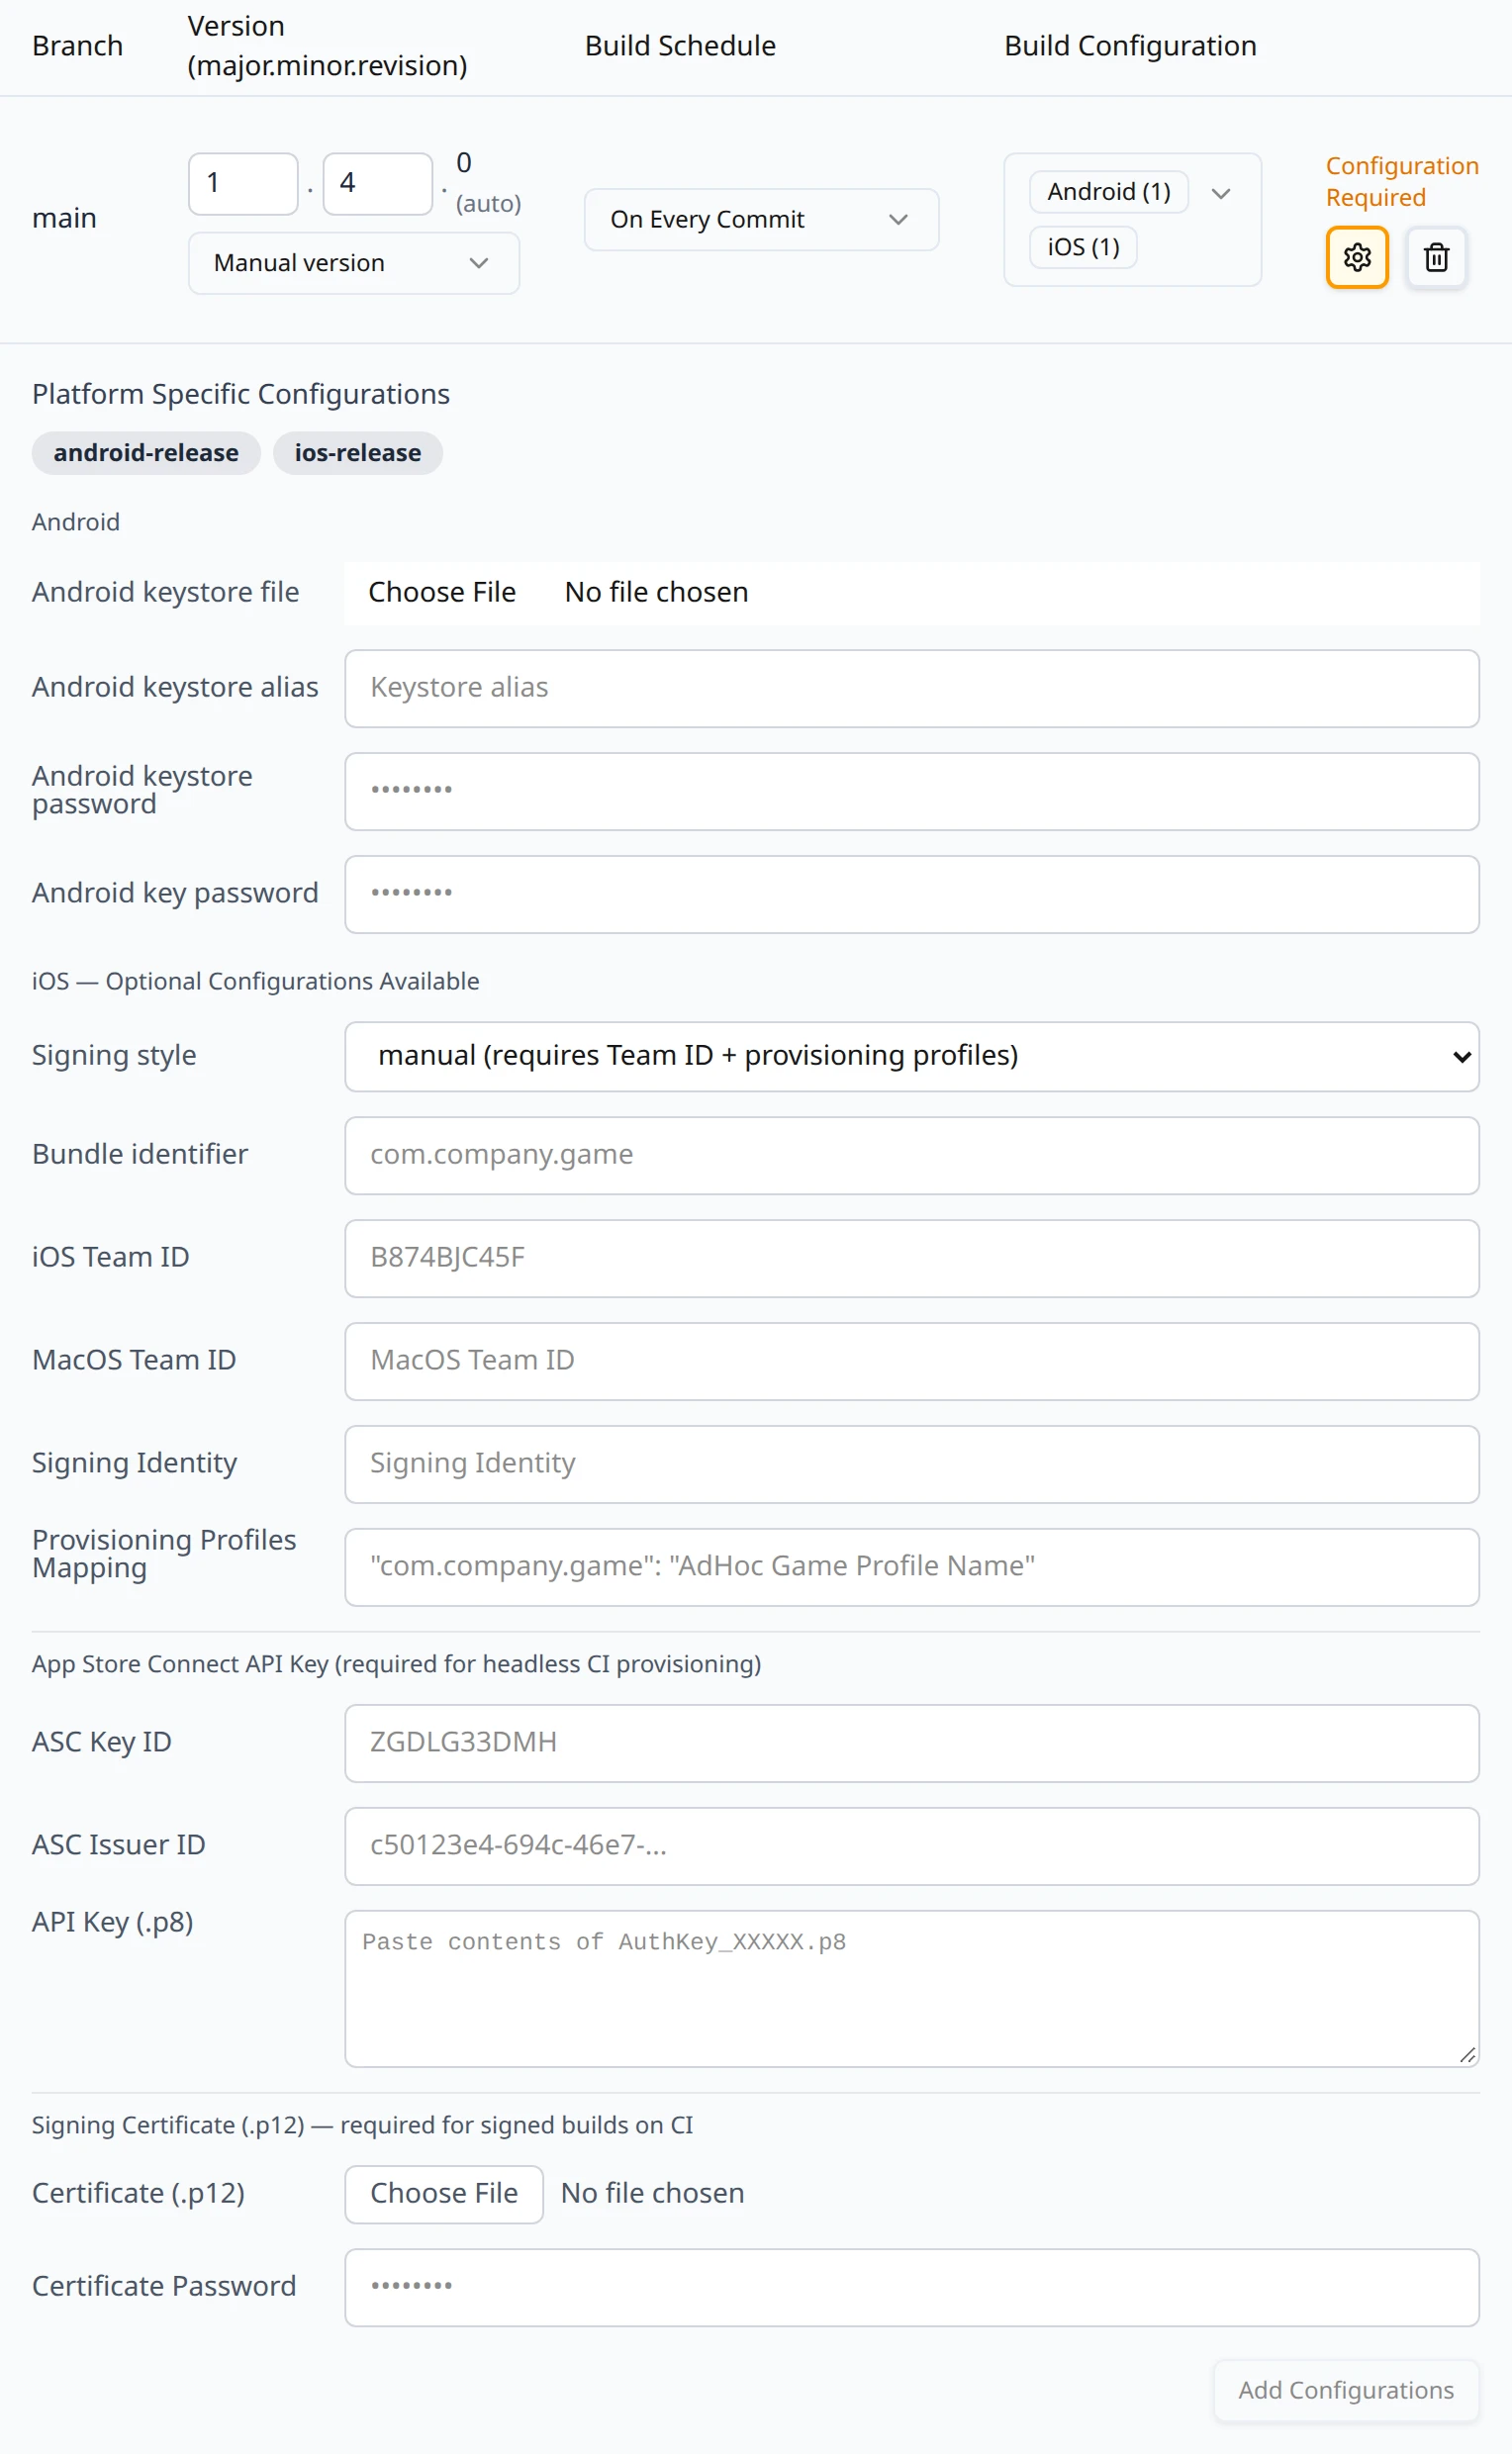
Android signing needs the keystore and the three values that unlock it. The panel does not save the Android group until all four are present.
| Field | What to enter |
|---|---|
| Android keystore file | Your release keystore, a .jks or .keystore file. The file is read in your browser and sent with the form; once chosen the row reads Keystore file loaded. |
| Android keystore alias | The alias of the signing key inside the keystore. |
| Android keystore password | The password that opens the keystore. Entered masked. |
| Android key password | The password for the key itself. Often the same as the keystore password; enter it anyway. |
Select a release or shipping Android configuration
In the branch row, pick
android-releaseorandroid-shipping. The cell shows Configuration Required.Open the gear and fill in the Android group
Choose the keystore file, then type the alias and both passwords.
Choose Add Configurations
The toast reads Configuration saved / Platform configuration has been saved for this branch. The Configuration Required label clears and the panel gains the line Platform specific signing is saved. You can edit values below and save again to update them.
The next Android build on the branch is signed with that keystore. A signed release build is what you upload to a store or sideload onto a device; the artifact is otherwise the same zip described on Your first build.
iOS
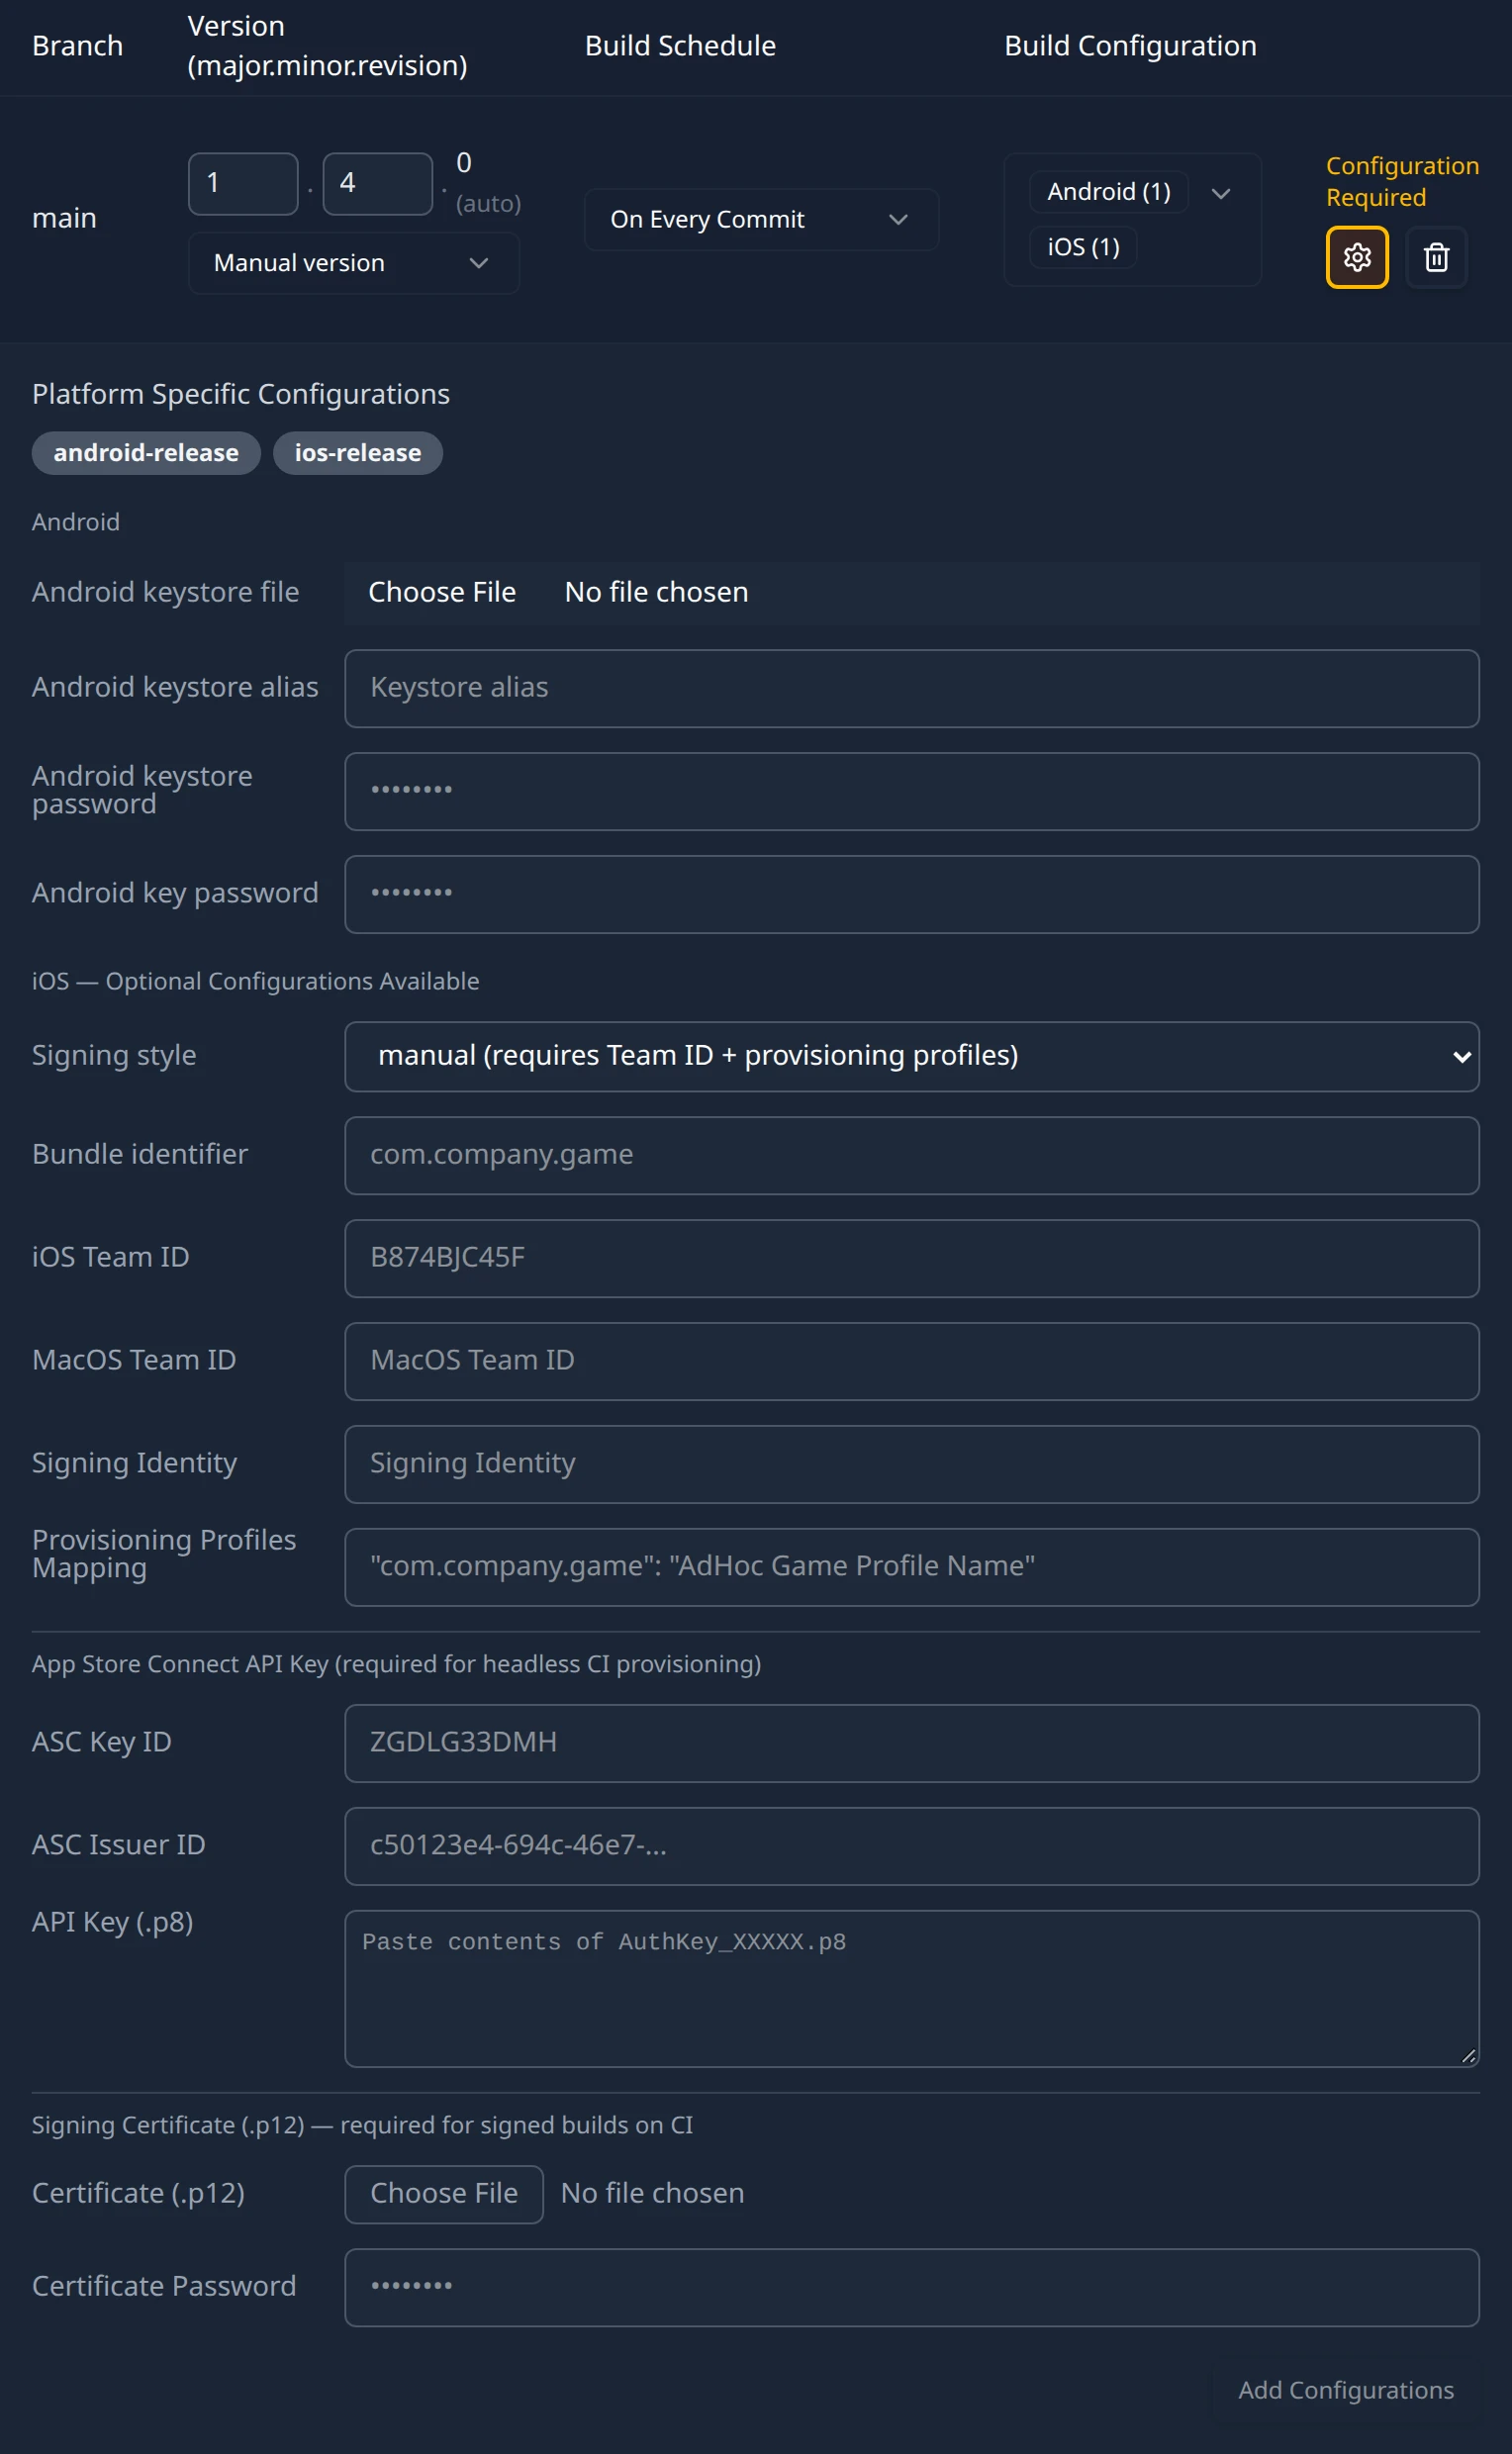
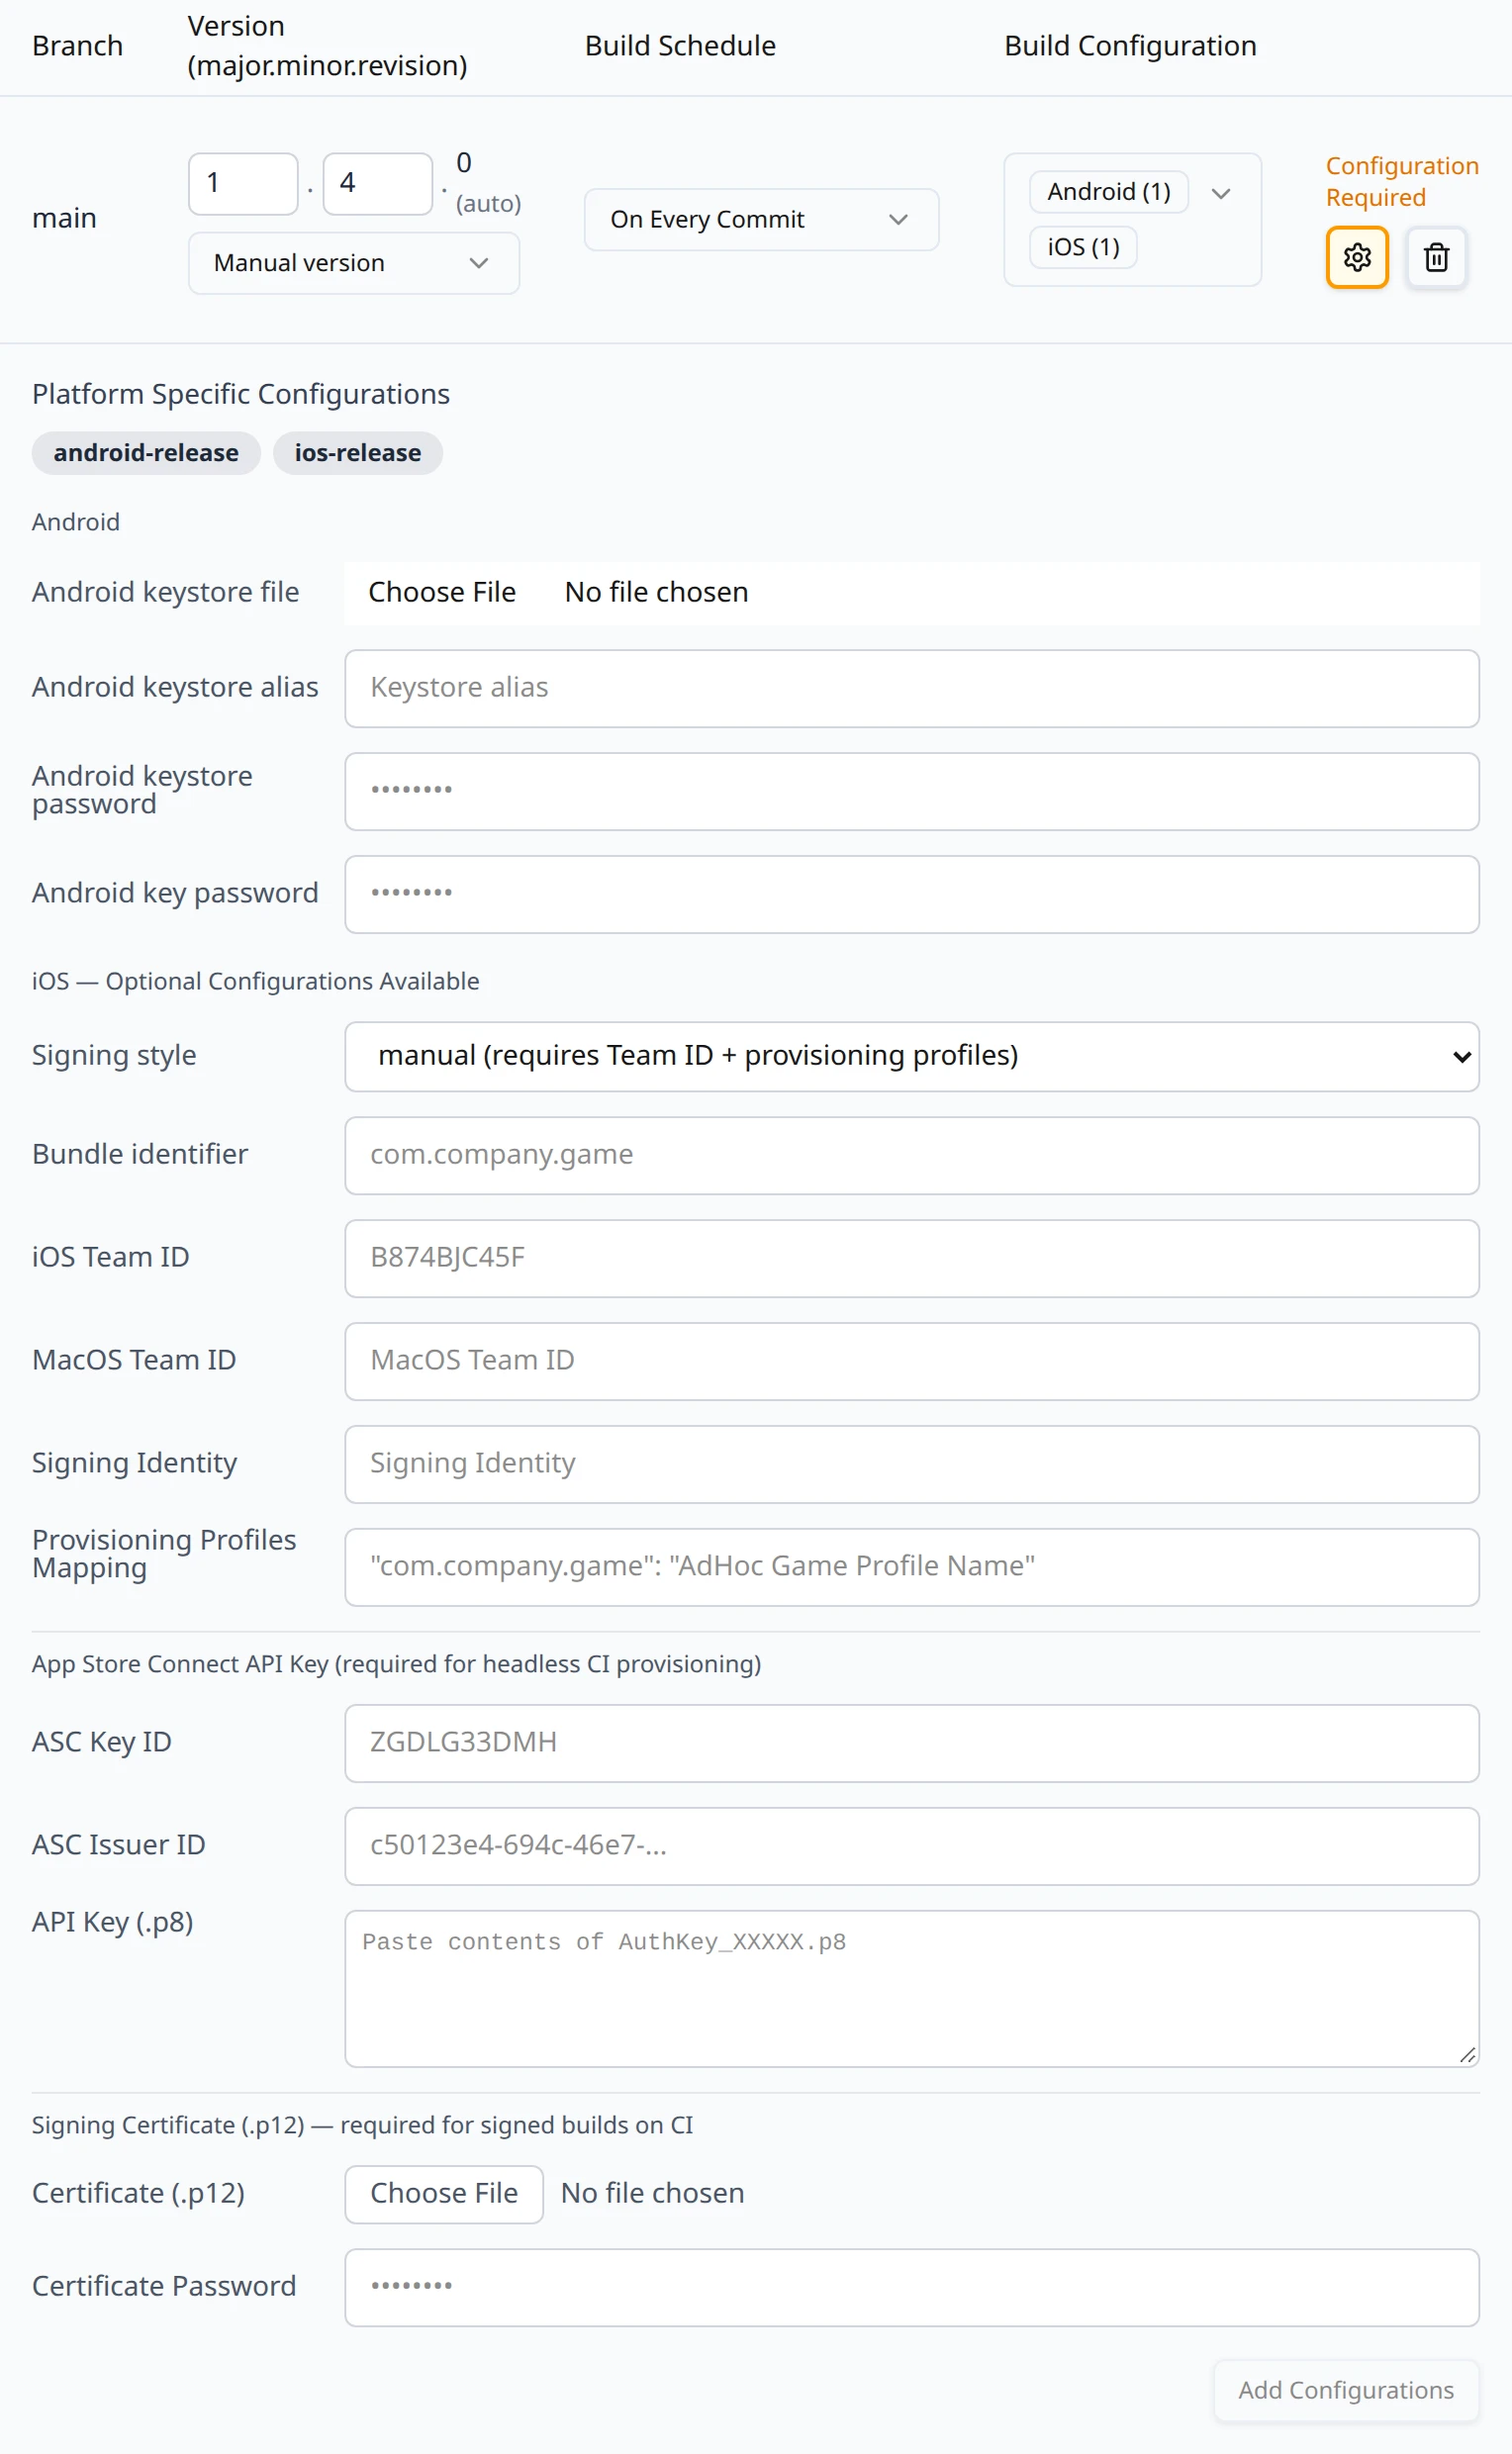
The iOS group is optional and layered. Start with Signing style, then add what that style needs.
| Signing style option | What it means |
|---|---|
| automatic (default — requires a Team ID) | The initial, unsaved value. Xcode manages profiles; you supply the team. |
| automatic | The same, chosen explicitly so it is stored on the branch. |
| manual (requires Team ID + provisioning profiles) | You supply the profiles; use Provisioning Profiles Mapping and the certificate below. |
| none (unsigned .app for pipeline testing — not installable) | Builds an unsigned app to prove the pipeline. It cannot be installed on a device. |
| Field | What to enter |
|---|---|
| Bundle identifier | The app's bundle id, for example com.northwind.starfall. |
| iOS Team ID | Your Apple Developer team id, ten characters. Required for automatic and manual signing. |
| MacOS Team ID | The team id for a macOS build on the same branch. Leave it empty if the branch does not build macOS. |
| Signing Identity | The certificate name Xcode should sign with, for manual signing. |
| Provisioning Profiles Mapping | Which profile applies to which bundle id, for manual signing. |
| ASC Key ID | Under App Store Connect API Key (required for headless CI provisioning): the key id from App Store Connect. |
| ASC Issuer ID | The issuer id shown with that key. |
| API Key (.p8) | The full text of the AuthKey_XXXXX.p8 file, pasted into the text area. |
| Certificate (.p12) | Under Signing Certificate (.p12) — required for signed builds on CI: your distribution certificate exported as .p12 or .pfx. Once chosen the row reads Certificate file loaded. |
| Certificate Password | The password you set when exporting the certificate. Entered masked. |
The App Store Connect key lets the build machine fetch or create provisioning profiles without a signed-in Apple ID, and the certificate is what actually signs. For a signed build you need both. Choose Add Configurations or Save changes as for Android; the same Configuration saved toast confirms it.
macOS
There is no macOS signing form in the app today. The panel opens only for branches that build Android or iOS, and the one macOS-related field it contains, MacOS Team ID, sits inside the iOS group. A branch whose only Apple configuration is macos-release has no gear button at all, so there is nowhere to enter a team id, a certificate or notarisation credentials for it. Sign and notarise the macOS artifact yourself after you download it.
What happens to what you save
Everything in the panel except Signing style is stored as a secret for the branch: encrypted, used by the build machine for builds on that branch, and never returned to the browser. Passwords are entered masked and the API key and certificate are sent once.
After a page reload the panel therefore comes back with every field blank except Signing style, which is stored on the branch itself and is shown again. Blank fields do not mean the values are gone: the saved line Platform specific signing is saved. You can edit values below and save again to update them. confirms a configuration exists, and builds keep using it.
If a save fails, the toast reads Failed to save platform specific secrets; the form keeps your entries so you can try again.
Build notifications
Below the webhook section of each repository card is Build notifications, introduced by Post build results to a Slack or Discord channel. Each entry is an incoming webhook in your chat tool; Build Stream posts to it when a job finishes.


Create an incoming webhook in Slack or Discord
In Slack, add the Incoming Webhooks app to the channel and copy the URL, which starts with
https://hooks.slack.com/services/. In Discord, open the channel's integrations, create a webhook and copy its URL, which starts withhttps://discord.com/api/webhooks/.Choose Add Slack/Discord webhook
Pick Slack or Discord in the service selector, paste the URL into Webhook URL, and leave On success and On failure ticked unless you want only one of them. Choose Add webhook.
Check the entry
The saved webhook is listed by service with a masked URL, host and last four characters only, for example
hooks.slack.com/…XXXX, and the events it posts on: success, failure or success + failure. The trash icon removes it. You can add more than one.
The form refuses these before anything is saved:
- Webhook URL must start with https://: the URL was pasted incomplete or with the scheme missing.
- Pick at least one of success/failure to notify on.: both boxes were unticked.
- The backend rejected this webhook. Check the URL and try again.: the URL did not pass the server's checks. Re-copy it from Slack or Discord.
The webhook URL is a credential: anyone holding it can post to your channel. Build Stream stores it and shows only the masked form afterwards. To rotate it, delete the entry, create a new webhook in your chat tool and add that. Notifications are per repository, so they cover every branch of northwind-games/starfall.
Each message is one line naming the repository, branch, version and build number, the configuration and the result, for example:
✅ starfall main v1.4.0 (build 4) [win32-release]: build succeeded
❌ starfall main v1.4.0 (build 5) [android-release]: build failed
A failure message carries the job's status line on a second line when there is one, which is the same text you find at the top of the log's Setup · stderr stream.
Something out of date or unclear? Email [email protected].